


Table of Contents
In today’s fast-paced digital world, having a website is crucial for any business or individual looking to establish a strong online presence. However, with so many website builders available, it can be tough to choose the right one. Are you looking for a platform that’s easy to use, yet offers powerful features and endless customization options?
Look no further than Shopify. But why choose Shopify over other website builders? How can it help you take your online presence to the next level? And how can you create a website that stands out from the crowd?
These are the questions we’ll answer in this guide. So, if you’re ready to embark on an exciting journey of website creation with Shopify, let’s get started and unlock the full potential of your online business!
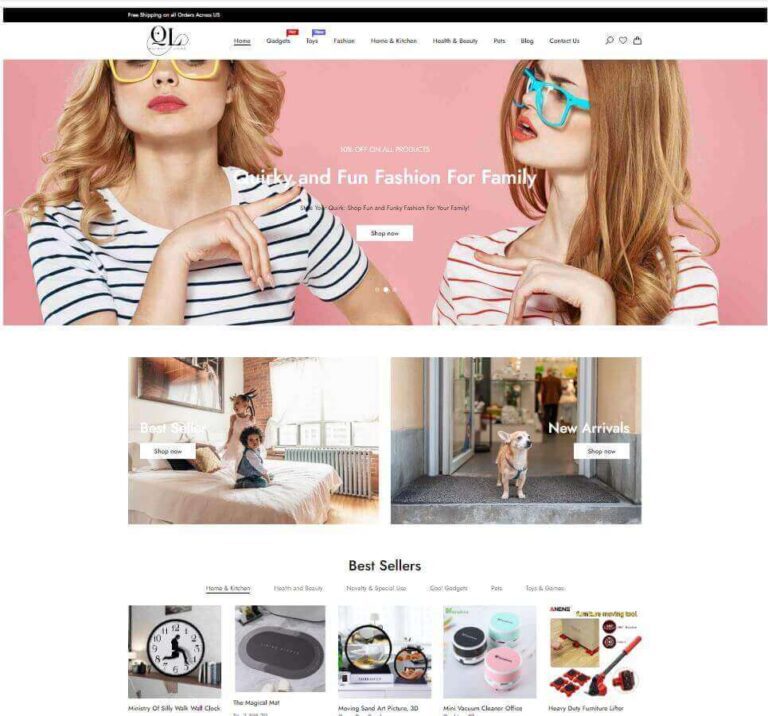
In this tutorial, we will guide you through the step-by-step process of setting up a Shopify store from scratch. I will use a live example of a POD and Dropshopping Store built with Shopify in a single day – Quirkylook, Lifestyle Store in US, which I will walk you through so even a newbie can build a Shopify website easily!
Let’s Dive In!

Why Shopify for Website Creation?
In my opinion, Shopify I absolutely the best tool for website creation for selling your products or services online.
1. User-Friendly Interface: Shopify is designed with the user in mind, making it incredibly easy to use, even for beginners. Its drag-and-drop interface allows you to customize your website without any coding skills.
2. Customizable Design: With thousands of themes and templates to choose from, Shopify allows you to create a website that perfectly reflects your brand and vision. Plus, you can customize the design further with your own branding, colors, and fonts.
3. Powerful E-commerce Features: Shopify is not just a website builder; it’s a complete e-commerce platform. It offers everything you need to sell online, including inventory management, payment processing, shipping options, and more.
4. Mobile-Friendly: In today’s mobile-first world, having a mobile-friendly website is crucial. Shopify’s responsive design ensures that your website looks great and works seamlessly on any device.
5. SEO Optimization: Shopify is built with SEO in mind, helping your website rank higher in search engine results pages. Plus, it offers built-in SEO features like title tags, meta descriptions, and alt text, making it easy to optimize your website for search engines.
6. Support and Resources: Shopify offers extensive support and resources to help you build and grow your website. From 24/7 customer support to a vast knowledge base and community forum, you’ll have all the help you need to succeed.
In summary, Shopify is the best choice for website creation because of its user-friendly interface, customizable design options, powerful e-commerce features, mobile-friendliness, SEO optimization, and extensive support and resources. With Shopify, you can create a website that looks great, works seamlessly, and drives results for your business.
Shopify vs Woocommerce vs Magento - Pros and Cons
There are many other options vs Shopify for Website creation, so I always get asked on the why Shopify? Well, here is a quick comparison of Shopify vs other leading plaforms for website building:
| Feature | Shopify | WooCommerce | Magento |
|---|---|---|---|
| User-Friendly Interface | Yes | No | No |
| Customizable Design | Yes | Yes | Yes |
| E-commerce Functionality | Yes | Yes | Yes |
| Mobile-Friendliness | Yes | Yes | Yes |
| SEO Optimization | Yes | Yes | Yes |
| Customer Support | 24/7 Support Available | Limited Support Available | Limited Support Available |
Step-by-Step Shopify Tutorial For Beginners
Ok, now we come to what you have been waiting for. Let’s start our Shopify Website creation adventure, in a simple step-by-step manner. Just follow my lead, and I promise it will be a breeze to create your own Shopify store!
Step 1: Sign up for a Shopify account
To get started, go to the Shopify website using this link and sign up.
Next, Shopify will ask you for some basic information such as your store name, your address and your phone number. Enter the relevant information.
Once you signup using my link, drop a mail to anurag@digicrusader.com for 100$+ worth free bonus from me, and a 30 min free consultation to review or help build your store, which is an exclusive offer from my end, for my readers!

Step 2: Sign in to Shopify and Choose a Shopify Pricing Plan
Once you have created your account, Shopify will prompt you to choose a pricing plan. Shopify offers different plans based on the features and tools that you require. As a beginner, we recommend starting with the Basic Shopify plan, which costs $29 per month.
Shopify offers three different pricing plans: Basic Shopify, Shopify, and Advanced Shopify. Each plan offers different features and pricing, allowing businesses of all sizes to find the right plan for their needs and budget.
The Basic Shopify plan starts at $29 per month and includes all the essentials for creating and launching an online store. This plan includes features such as unlimited products, storage, and bandwidth, a free SSL certificate, 24/7 support, and more.
The Shopify plan starts at $79 per month and includes all the features of the Basic Shopify plan, plus additional features such as gift cards, professional reports, abandoned cart recovery, and more. This plan is ideal for businesses that are looking to scale their operations and take their online store to the next level.
The Advanced Shopify plan starts at $299 per month and includes all the features of the Shopify plan, plus additional features such as advanced report building, third-party calculated shipping rates, and more. This plan is ideal for businesses that are experiencing rapid growth and need advanced features to manage their operations.
In addition to these three plans, Shopify also offers a Shopify Lite plan for $9 per month, which allows businesses to sell on Facebook, accept payments in person, and more.
You can sign up via the below link to claim a 1$ or 20 INR promotion for 3 months, and use that time to build and scale your own shopify store! Additionally, Shopify offers a 14-day free trial for all plans, allowing businesses to test out the platform and its features before committing to a paid plan.

Step 3: Connecting Domain name with Shopify
You can either buy a domain through Shopify or connect existing/new domain. Here are the steps to connect your domain with your Shopify store, if you have bought the domain separately:
1. Purchase a Domain – First, you’ll need to purchase a domain name from a domain registrar like GoDaddy or Namecheap. Choose a domain name that’s relevant to your business and easy for customers to remember.
2. Verify Domain Ownership – Once you’ve purchased your domain, you’ll need to verify that you own it. You can do this by adding a TXT record to your domain’s DNS settings. Shopify provides detailed instructions for verifying your domain ownership. You can choose the simple “Connect Automatically” Option, or do it manually.
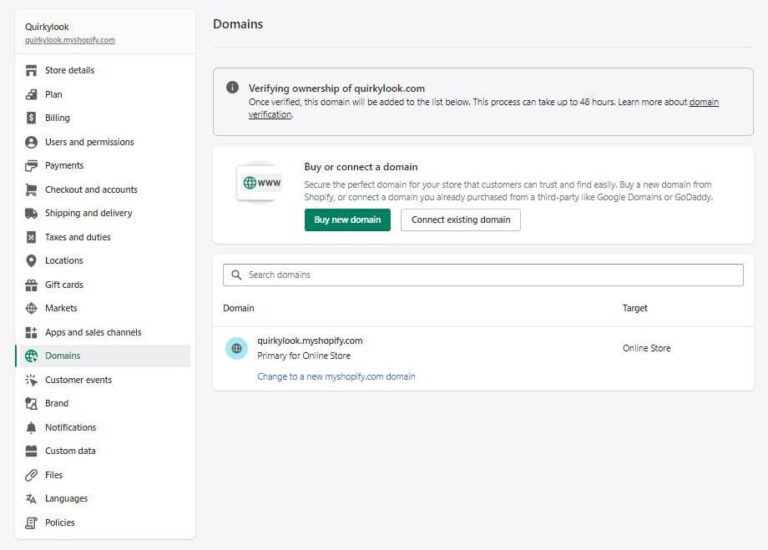
3. Connect Your Domain – After you’ve verified your domain ownership, you can connect your domain to your Shopify store. To do this, go to your Shopify admin panel and click on “Online Store” > “Domains”. Click “Connect Existing Domain” and follow the prompts to connect your domain. It can be done automatically, or via step below.
4. Configure DNS Settings – Once you’ve connected your domain, you’ll need to configure your DNS settings to point your domain to your Shopify store. To do this, go to your domain registrar’s website and find the DNS settings for your domain. Then, add a CNAME record that points your domain to your Shopify store’s URL. Shopify provides detailed instructions for configuring your DNS settings.
5. Set Your Primary Domain – Finally, set your primary domain in Shopify. This is the domain that customers will see when they visit your store. To set your primary domain, go to “Online Store” > “Domains” and select your domain from the list. Then, click “Set as Primary Domain”.
By following these steps, you’ll be able to connect your domain to your Shopify store and start selling your products or services to customers.
If you sign up for Shopify via link below, you get a free 30 min consultation from me to troubleshoot any issues you face to help you build your Shopify website.

Step 3: Customize your Shopify store
After selecting a plan, Shopify will prompt you to customize your store. You can choose a theme, add products, and create pages for your store.
1. Choose a theme – Log in to your Shopify account and go to the “Themes” section. Browse through the available themes and choose one that aligns with your brand’s aesthetic and style. Once you’ve selected a theme, click “Customize” to begin customizing it. Remember the mantra – simple is better!
2. Customize your homepage – On the theme customization page, navigate to the “Home page” section. Here, you can add or edit sections such as hero images, featured products, and testimonials. Add high-quality images that showcase your products or services, and use clear calls to action to guide visitors to your products.
3. Create custom pages – Go to the “Pages” section of your Shopify dashboard and click “Add page” to create a new custom page. Choose a title for your page and add content such as your brand’s story, mission, and values. Use images and graphics to make your page visually appealing and engaging.
4. Add products to your Shopify store – Here’s a step-by-step guide on how to add a product to your Shopify store:
- Log in to your Shopify account and click “Products” in the sidebar.
- Click “Add product” to create a new product listing.
- Enter a title for your product, as well as a detailed description. Be sure to include information such as the product’s features, benefits, and any relevant specifications.
- Upload high-quality images of your product, showcasing it from different angles and in use.
- Enter the price for your product, as well as any variants such as size or color.
- Set up shipping options and rates for your product. You can choose to offer free shipping, flat-rate shipping, or real-time carrier shipping rates based on the weight and destination of the product.
- Add product tags to help customers find your product through search. You can add tags such as product type, color, material, and more.
- Enter any additional product details, such as SKU, barcode, and inventory levels.
- Click “Save” to publish your product to your store.
5. Add custom features – Go to the “Apps” section of your Shopify dashboard and browse through the available apps and plugins. Choose apps that align with your business goals and can enhance the user experience for your customers. For example, you could add a product reviews app to allow customers to leave reviews on your products, or a social media integration app to showcase your brand’s social media feeds.
6. Customize your checkout process – Go to the “Settings” section of your Shopify dashboard and navigate to the “Checkout” section. Here, you can customize the fields that customers need to fill out during checkout, as well as the shipping options and payment gateways that are available. Make sure that your checkout process is smooth and easy to navigate, with clear calls to action and minimal steps.
7. Personalize your emails – Go to the “Settings” section of your Shopify dashboard and navigate to the “Notifications” section. Here, you can customize your order confirmation, shipping confirmation, and other transactional emails to include your branding and messaging. Use clear and friendly language to build a stronger relationship with your customers and enhance their overall experience with your brand.
Overall, customizing your Shopify store is an ongoing process that requires patience, creativity, and attention to detail. By following these steps and experimenting with different customization options, you can create a store that stands out and drives sales.
Step 4: Set up payment and shipping options
To start accepting payments on your Shopify store, you need to set up payment options. Shopify offers different payment gateways such as PayPal or Stripe.
To set up payment options, click on the “Settings” tab in the Shopify dashboard and then click on the “Payment providers” button. Choose the payment provider that you want to use and follow the instructions to set it up.
You also need to set up shipping options. Shopify allows you to set up different shipping zones, rates and methods. Click on the “Settings” tab in the Shopify dashboard and then click on the “Shipping” button.
Step 5: Launch your Shopify store
Once you have customized your store, added products and set up payment and shipping options, you are ready to launch your Shopify store.
To launch your store, click on the “Online Store” tab in the Shopify dashboard and then click on the “Preferences” button. Under “Store availability”, select “Online store” and then click on the “Save” button.
Congratulations! You have successfully set up your Shopify store.
Step 6: Optimize your Shopify Website for SEO and Traffic
To ensure that your Shopify store is successful, you need to optimize it for search engines and users. Here are some tips to optimize your Shopify store:
a) Use keywords in your product titles and descriptions to help users find your products.
b) Add alt tags to your images to improve accessibility and SEO.
c) Use descriptive URLs for your pages to make it easy for users to navigate your store.
d) Use social media to promote your store and attract more customers.
e) Install apps from the Shopify App Store to add more features and tools to your store.
Key Settings on How to Create a Website with Shopify
Here are some important settings to consider when setting up your Shopify store:
1. General Settings – Under General Settings, you can configure your store’s name, email address, and time zone. You can also choose your store’s currency and set up tax rates.
2. Payment Providers – Under Payment Providers, you can set up the payment gateways that you’ll use to process payments from customers. Shopify supports a wide range of payment providers, including PayPal, Stripe, and Shopify Payments.
3. Shipping – Under Shipping, you can set up your shipping rates and methods. You can choose to offer free shipping, flat rate shipping, or shipping rates based on weight or destination.
4. Checkout – Under Checkout, you can customize your checkout process to match your brand and streamline the buying process for customers. You can add custom fields, choose which fields are required, and customize the colors and fonts used in the checkout.
5. Notifications – Under Notifications, you can set up automatic notifications to keep you and your customers informed about order status, shipping updates, and other important events.
6. Legal – Under Legal, you can add your store’s Terms of Service, Privacy Policy, and Refund Policy pages. These pages are important for compliance with legal requirements and for building trust with customers.
7. Sales Channels – Under Sales Channels, you can connect your store to other sales channels, such as Facebook, Instagram, and Amazon. This can help you reach a wider audience and increase sales.
By taking the time to carefully configure these settings, you’ll be able to create a streamlined, professional-looking store that’s optimized for sales and customer satisfaction.
Which Shopify Pricing Plan is the Best for Website?
Let’s check out the 3 Commercial Shopify Pricing Plans which are available. In Addition, there is a 9$ plan, which you can use to gain an understanding and build the store but not scalable.

I would recommend the Shopify Basic Plan if you are just starting out. Plus you can get a special 3 month deal at 1$ per month, plus an exclusive bonus worth 100$+ when you sign up for Shopify plans via below link.

Top 5 Shopify Themes For Creating Your Website
1. Debut (Free) – Debut is a popular free Shopify theme that’s great for new businesses just starting out. It’s simple and clean, with a customizable homepage and a mobile-friendly design. It also includes features such as a slideshow banner, product filtering, and social media icons.
2. Brooklyn (Free) – Brooklyn is another free Shopify theme that’s ideal for businesses with a small catalog of products. It features a responsive design, a customizable homepage, and a full-width header image. It also includes features such as product zoom, related products, and social media integration.
3. Porto ($99) – Porto is a highly customizable and responsive Shopify theme that’s designed to help you create a professional-looking online store quickly and easily. It features a clean and modern design, multiple homepage layouts, and a range of customization options. It also includes features such as a mega menu, product filtering, and a quick view option.
4. Shella ($59) – Shella is a flexible and feature-packed Shopify theme that’s ideal for businesses looking to create a high-converting online store. It includes a range of homepage layouts and customization options, as well as features such as a multi-level mega menu, product swatches, and a product quick view. It’s also optimized for search engines and offers fast page load times.
5. Basel ($59) – Basel is a popular Shopify theme that’s designed for businesses looking for a clean and modern online store design. It includes multiple homepage layouts, a responsive design, and a range of customization options. It also includes features such as product filtering, a quick view option, and a custom product page layout.
By choosing one of these top Shopify themes, you can create a professional and effective online store that will help drive sales and engage with customers. Whether you opt for a free theme or invest in a premium one, you’re sure to find a theme that suits your business needs and helps you stand out from the competition.

Top 15 Shopify Apps or Plugins for your Website
I recommend these plugins and apps for your Shopify store, so you can optimize your website for increased sales, improved customer engagement, and better search engine rankings.
1. Avada Email Marketing – This app provides email marketing tools to help you engage with your customers and increase sales. It offers customizable email templates, automation features, and detailed analytics.
2. Judge.me – This app allows you to collect and display customer reviews on your website. It includes features such as automatic review requests, review widgets, and social proof notifications.
3. Booster – This app offers a suite of marketing tools to help you increase sales and conversions. It includes features such as social proof notifications, urgency timers, and upsell and cross-sell pop-ups.
4. MaxSale – This app offers advanced sales and conversion optimization features such as exit intent pop-ups, email capture forms, and countdown timers.
5. Zendrop – This app offers a platform for dropshipping with a curated selection of products, automated order fulfillment, and product customization options.
6. Printful – This app offers print-on-demand services for custom products such as t-shirts, hoodies, and mugs. It integrates seamlessly with your Shopify store, allowing you to easily add and sell custom products.
7. Multi-Currency Converter Hero – This app offers a simple and customizable currency converter widget to display on your store, allowing customers to view product prices in their local currency.
8. PageFly – This app offers a drag-and-drop page builder to create custom landing pages, product pages, and more. It includes features such as responsive design, animation effects, and custom code integration.
9. Facebook – This app allows you to connect your Shopify store with your Facebook account, enabling you to easily create and manage Facebook ads and track conversions.
10. TikTok – This app allows you to create and manage TikTok ads directly from your Shopify store, reaching a new audience and increasing brand awareness.
11. Smile – This app offers a loyalty and rewards program to incentivize repeat purchases and customer referrals. It includes features such as points and rewards systems, referral tracking, and email campaigns.
12. Tidio – This app offers a chatbot and live chat solution to engage with customers and provide real-time support. It includes features such as chatbots, automation workflows, and customizable design options. I use this app across all my shopify stores and websites, and it has been pure magic in terms of increasing my customer conversions! You must try it out to believe me.
13. Ultimate Trust Badges – This app offers trust badges to display on your store, helping to build trust and credibility with your customers. It includes features such as customizable badge designs and placement options.
14. Avada SEO – This app offers SEO optimization tools to help your store rank higher in search engine results. It includes features such as meta tags, sitemap generation, and keyword analysis.
15. Vajro – This app offers a mobile app builder to create a custom mobile app for your Shopify store. It includes features such as push notifications, analytics, and customizable design options.
By using these plugins, you can add more functionality and features to your Shopify store and improve your overall customer experience. Each plugin serves a specific purpose and can help you accomplish different goals, so be sure to choose the ones which suits your goal.
How to Create A Website With Shopify - Mandatory Pages
When setting up a Shopify store in the US and other markets, there are several mandatory pages that you’ll need to include in order to comply with legal requirements. These pages are designed to protect both you and your customers, and failing to include them can result in legal issues or lost sales. Here are some of the most important mandatory pages for a Shopify store in the US:
1. Terms of Service – The Terms of Service page outlines the terms and conditions that govern the use of your website and the purchase of your products. This page should include information on payment terms, shipping and delivery, returns and refunds, and any other relevant policies.
2. Privacy Policy – The Privacy Policy page outlines how you collect, use, and protect your customers’ personal information. This page should include information on the types of data you collect, how you use that data, and how you protect it.
3. Shipping Policy – The Shipping Policy page outlines your shipping rates, delivery times, and any other relevant information about shipping and delivery. This page should also include information on how customers can track their orders and what to do if an order is lost or damaged.
4. Refund Policy – The Refund Policy page outlines your policy on returns and refunds, including any restrictions or conditions that may apply. This page should include information on how customers can initiate a return or refund, what the process entails, and how long it takes to receive a refund.
5. About Us – The About Us page is not mandatory, but it’s a good idea to include it in order to build trust and credibility with your customers. This page should include information on your company’s history, mission, and values, as well as any relevant information about your team.
6. Contact Us – The Contact Us page should include information on how customers can get in touch with your customer support team, including phone numbers, email addresses, and physical addresses if applicable.
By including these mandatory pages in your Shopify store, you’ll be able to comply with legal requirements and provide your customers with the information they need to make informed purchasing decisions. Sign up with the below link, and I will provide all these pages, done for you, free of cost!
How to Create A Website With Shopify - Free Tools
Free tools you can use to get necessary branding assets for your Shopify store:
1. Canva – Canva is a popular graphic design tool that allows you to create custom graphics for your Shopify store. You can use it to design your store’s logo, social media posts, website banners, and more. Canva offers a wide range of templates, fonts, and graphics that you can use for free.
2. Unsplash – Unsplash is a website that provides free high-quality stock photos that you can use for your Shopify store. You can search for images by keyword or browse popular categories like nature, food, and people. Unsplash offers a wide range of images that you can use for free without attribution.
3. GIMP – GIMP is a free and open-source image editing tool that’s similar to Photoshop. You can use it to edit photos and create custom graphics for your Shopify store. GIMP offers a wide range of tools and features that you can use to create professional-looking designs.
4. Google Fonts – Google Fonts is a library of free fonts that you can use for your Shopify store. You can choose from a wide range of fonts that are optimized for web use and customize them to match your brand.
5. Namecheap Logo Maker – Namecheap Logo Maker is a free tool that allows you to create a custom logo for your Shopify store. You can choose from a wide range of templates and customize them with your own text and graphics.
By using these free tools, you can create custom branding assets for your Shopify store without breaking the bank. With a little creativity and effort, you can create a professional-looking store that attracts customers and builds your brand.
Top 10 Business Ideas to Start a Website with Shopify at Zero Investment
10 business ideas that anyone can start with no investment and the potential for high profits using a Shopify store:
1. Print-on-demand merchandise – With a print-on-demand service like Printful or Gooten, you can create custom t-shirts, hats, mugs, and more with no upfront costs. Simply design your products, add them to your Shopify store, and let the print-on-demand service handle production and shipping.
2. Digital products – Digital products like ebooks, courses, and printables can be created with little to no upfront costs and sold on your Shopify store. With the right marketing, digital products can provide a high-profit margin and can be sold to customers all over the world.
3. Dropshipping – As mentioned earlier, dropshipping allows you to sell products without holding inventory. Simply find a supplier, add their products to your Shopify store, and let them handle the shipping and fulfillment.
4. Affiliate marketing – With affiliate marketing, you promote other companies’ products and earn a commission on each sale. By partnering with companies that align with your brand, you can create a passive income stream through your Shopify store.
5. Subscription boxes – Subscription boxes have become increasingly popular in recent years and can be a lucrative business idea. With a little creativity, you can create a subscription box that caters to a specific niche and offers a recurring revenue stream.
6. Niche products – By finding a unique product or niche, you can create a profitable business on your Shopify store. Look for products that are not easily found in stores or that cater to a specific audience.
7. Pet products – Pet owners are a dedicated audience and are willing to spend money on products that cater to their pets. From pet accessories to specialty food items, there are many profitable opportunities in the pet industry.
8. Fitness products – The fitness industry is booming, and there are many opportunities to create and sell fitness products on your Shopify store. From workout gear to supplements, there are many profitable niches to explore.
9. Beauty products – With the rise of social media, the beauty industry has exploded in recent years. By finding unique and high-quality beauty products, you can create a profitable business on your Shopify store.
10. Personalized gifts – Personalized gifts have become increasingly popular in recent years, and there are many opportunities to create and sell personalized products on your Shopify store. From custom jewelry to personalized home decor, there are many profitable niches to explore.
By choosing one of these business ideas and creating a Shopify store, you can start a business with little to no investment and the potential for high profits. With the right marketing and strategy, you can build a successful online business that can provide financial freedom and flexibility.
Pitfalls to avoid: Essential Part of Shopify Tutorial for Beginners
Here are some common pitfalls that beginners should watch out for when setting up a Shopify store:
1. Overcomplicating the design – While it’s important to have an attractive and professional-looking store, it’s also important not to overcomplicate things. Too many design elements, fonts, and colors can be overwhelming for visitors and may make your store look cluttered. Keep your design simple and clean, and focus on highlighting your products.
2. Not optimizing for mobile – With the majority of internet traffic now coming from mobile devices, it’s essential to make sure that your Shopify store is optimized for mobile. Make sure that your site is responsive and that it looks and functions well on a range of different screen sizes.
3. Not having a clear value proposition – Your value proposition is what sets your store apart from competitors and explains why customers should buy from you. Make sure that your value proposition is clear and compelling, and that it’s prominently displayed on your homepage.
4. Neglecting SEO – Search engine optimization (SEO) is essential for driving traffic to your store and improving your visibility in search engine results. Make sure that you’re optimizing your product titles, descriptions, and metadata, and that you’re using relevant keywords.
5. Neglecting customer support – Providing excellent customer support is essential for building trust and loyalty with your customers. Make sure that you have a clear process for handling customer inquiries and complaints, and that you’re responsive and helpful.
6. Not properly managing inventory – Running out of stock on popular items can be frustrating for customers and may hurt your reputation. Make sure that you’re properly managing your inventory and that you’re regularly updating your stock levels.
7. Not properly tracking and analyzing performance – Analytics are essential for understanding how your store is performing and identifying areas for improvement. Make sure that you’re regularly tracking and analyzing key metrics such as traffic, conversion rates, and average order value, and that you’re making changes as needed to improve your performance.
By being aware of these common pitfalls and taking steps to avoid them, beginners can set themselves up for success when setting up a Shopify store.
Best Practices To Create A Website With Shopify
Let’s say you’re running a t-shirt Shopify store, there are several best practices you can follow to increase your chances of getting high conversions. Here are some tips:
1. High-Quality Product Images: Since t-shirts are a visual product, having high-quality images is essential. Make sure your product images are clear, well-lit, and showcase the design or print on the t-shirt. Use multiple images to show different angles and close-ups of the design.
2. Use Social Proof: Social proof can help build trust with potential customers and encourage them to make a purchase. Include customer reviews, ratings, and testimonials on your product pages to show that other people have bought and loved your t-shirts.
3. Create Urgency: Use urgency tactics to encourage customers to take action and make a purchase. Consider offering limited-time discounts, creating a countdown timer, or adding “Only X left in stock” messaging to create a sense of urgency.
4. Clear and Simple Product Descriptions: Make sure your product descriptions are clear, concise, and highlight the key features of your t-shirts. Avoid using technical jargon or industry-specific terms that may confuse customers.
5. Offer Free Shipping: Shipping costs can be a major turn-off for customers. Consider offering free shipping, even if you need to increase the price of your t-shirts slightly to cover the cost. This can increase conversions and reduce cart abandonment rates.
6. Highlight Your Unique Selling Point: With so many t-shirt stores out there, it’s important to have a unique selling point that sets your brand apart. Whether it’s your designs, quality, or customer service, make sure you highlight what makes your brand special.
7. Optimize Your Checkout Process: The checkout process is where many potential customers drop off, so make sure it’s as seamless and straightforward as possible. Consider offering multiple payment options, including guest checkout, and minimizing the number of steps required to complete the purchase.
By following these best practices, you can increase the chances of getting high conversions for your t-shirt Shopify store.
Shopify POD (Print on Demand) - Done For Your Website For Free
Looking to start your own print-on-demand business? Shopify and Printful are the perfect combination for anyone looking to start their own online store. With Printful, you can easily create and sell your own custom products without having to worry about inventory or shipping, and with Shopify as your ecommerce platform, you can easily manage your store and process orders.
Purchase through my links and drop me a note at anurag@digicrusader.com, and I’ll offer you free website as per your business needs, and an exclusive bonus!
Shopify Dropshipping - Done For Your Website For Free
Ready to start your own dropshipping business? With Zendrop, you can easily find and source high-quality products from top suppliers worldwide, and with Shopify as your ecommerce platform, you can easily manage your store, process orders, and drive sales.
Purchase through my links and drop me a note at anurag@digicrusader.com, and I’ll help you build a custom Shopify store tailored to your needs. Plus, I’ll offer you an exclusive bonus to help you get started!
Exclusive Shopify Bonus Offer and Discount Link
I have great news for you – as an exclusive bonus offer, I am offering a discount link for accessing Shopify’s Basic plan at only $1 per month for the first three months!
But wait, there’s more! As a special bonus, I am also offering over $100 worth of free resources and tools to help you get started on your ecommerce journey. These resources include helpful ebooks, guides, and tutorials on topics such as branding, marketing, and design, and a free 30 min consultation as well!
With Shopify’s easy-to-use platform, you can create a beautiful and professional online store in no time. Whether you’re looking to sell physical products or digital downloads, Shopify has everything you need to get started. Plus, with the bonus resources I am offering, you’ll have access to expert tips and advice on how to make your store stand out and succeed.
Don’t miss out on this amazing offer – click the link below to access the exclusive discount and bonus resources today!

FAQ on How to create a Website with Shopify
-
1. How to use Shopify?
Shopify provides a user-friendly interface to set up an online store, manage products, orders, and customers. You can start by signing up for a Shopify account and selecting a theme. After that, you can customize the theme and add products, set up payment and shipping options, and launch your store.
-
2. How much does Shopify cost?
Shopify offers different pricing plans based on the features you need. The Basic Shopify plan starts at $29 per month, while the Shopify plan starts at $79 per month. The Advanced Shopify plan is $299 per month. There are additional fees for payment processing, shipping, and any apps you choose to install. If you subscribe via this Shopify Link, you can get first 3 months for 1$, and also an exclusive bonus from me worth 100$+. Just mail to anurag@digicrusader.com post your Shopify plan purchase to claim your exclusive bonus.
-
3. What are the best Shopify apps?
The best Shopify apps for your store depend on your specific needs. Some popular options include Zendrop for dropshipping, Avada for email marketing, Printful for Print on Demand, and Refersion for affiliate marketing. You can browse the Shopify App Store to find apps that suit your business requirements.
-
4. How to customize Shopify themes?
Shopify themes offer a range of customization options to help you create a unique online store. You can use the built-in theme editor to customize your store's design, or you can hire a Shopify expert to help you with more advanced customizations. You can also write to me at anurag@digicrusader.com for any help!
-
5. How to optimize Shopify for SEO?
To optimize your Shopify store for SEO, you can start by researching keywords and optimizing your product titles and descriptions accordingly. You can also work on improving your site speed, building high-quality backlinks, and ensuring your site is mobile-friendly.
-
6. How can I get a discount or offer on Shopify?
Here is the link to 3 months discount on Shopify. In addition, you get a 100$+ worth of bonus when you purchase via this link. Just drop a note to anurag@digicrusader.com post your purchase.


1 Comment